1. Before the Makeover
Before we turned this living room from drab to fab, it was stuck in a time warp. The space felt tired and uninspired, with furniture that had clearly seen better days. Think bulky sofas in outdated fabrics, mismatched pieces that didn’t speak to each other, and lighting that barely did its job.
The Main Issues
What really stood out was the lack of cohesive design. There was no clear theme or style tying the room together. The layout didn’t make the most of the space either—furniture was awkwardly placed, making it hard to move around or use the area efficiently.
Original Living Room Problems
| Issue | Description |
|---|---|
| Outdated Furniture | Sofas and chairs were worn out and visually heavy |
| No Design Theme | Mismatched colors and styles created visual clutter |
| Poor Layout | Inefficient use of space limited functionality |
| Lack of Storage | No built-in solutions for organizing books, games, or electronics |
| Dull Lighting | Dim overhead light made the room feel gloomy |
Missed Opportunities
This living room had great potential—it just wasn’t being used well. Large windows were covered by heavy drapes that blocked natural light. Walls sat bare when they could have showcased art or shelving. The fireplace, which could’ve been a stunning focal point, went completely unnoticed due to poor styling.
The Takeaway
This “before” space might look familiar to many homeowners: full of promise but weighed down by outdated choices and missed opportunities. But don’t worry—change is coming!
2. Design Inspiration & Vision
Before we picked up a single paintbrush or moved any furniture, we started with a clear vision of what we wanted the living room to become. The goal was simple: turn a dull, outdated space into a warm, welcoming area that reflects modern comfort and personal style. Heres how we brought our ideas to life.
Mood Board Magic
Creating a mood board helped us visualize the overall vibe for the remodel. We gathered images from Pinterest, home décor magazines, and Instagram that matched our dream aesthetic. Think cozy textures, natural light, and a mix of modern and rustic elements.
Color Palette
We chose colors that felt both calming and stylish. Neutrals set the tone, while subtle pops of color added personality without overwhelming the space.
| Color | Description | Use in Room |
|---|---|---|
| Soft White | Crisp and clean background color | Walls and ceiling |
| Warm Taupe | Adds warmth and depth | Sofa and rug accents |
| Sage Green | Earthy touch of calmness | Pillows and plants |
| Matte Black | Modern edge and contrast | Lighting fixtures and hardware |
Style Influences
We were inspired by a blend of modern farmhouse and Scandinavian design. Clean lines, functional furniture, lots of light, and natural materials like wood and linen helped guide our choices. We also wanted to add personal touches like family photos, artwork, and vintage finds to make the space feel truly ours.
Main Style Elements:
- Neutral tones with organic textures
- Open layout with cozy seating areas
- Layered lighting for warmth and flexibility
- Simplified decor with meaningful pieces
The Vision in Action
The ultimate goal was to create a space that felt inviting every day yet polished enough for entertaining guests. We wanted it to be a place where you could kick back with your favorite book or host game night with friends—all while feeling completely at home.

3. The Renovation Process
Transforming our outdated living room into a fresh, stylish space didn’t happen overnight. It took careful planning and a step-by-step approach to bring our vision to life. Here’s how we tackled the remodel from start to finish.
Step 1: Demolition
The first stage of the renovation was all about clearing out the old to make room for the new. We removed outdated carpeting, took down old light fixtures, and stripped away worn-out trim and molding. This gave us a blank canvas to work with.
Step 2: Painting
Fresh paint made an immediate difference. We chose a neutral palette with soft grays and off-whites to brighten up the room while keeping it cozy. Accent walls were painted in a deeper shade to add depth and character.
Step 3: Flooring Upgrades
We replaced the old carpet with wide-plank engineered hardwood floors in a warm oak finish. This not only elevated the look of the space but also made it more durable and easier to clean.
| Before | After |
|---|---|
| Worn beige carpet | Engineered hardwood (Oak finish) |
| Squeaky floorboards | Reinforced subfloor for stability |
Step 4: Lighting Installation
Lighting played a huge role in setting the mood. We installed recessed ceiling lights for general illumination and added wall sconces for ambiance. A modern chandelier above the coffee table became a focal point in the center of the room.
Lighting Features Added:
- Dimmable LED recessed lights
- Wall-mounted sconces with matte black finish
- Statement chandelier with brushed brass accents
Step 5: Other Key Changes
To tie everything together, we added built-in shelving around the fireplace, upgraded baseboards and crown molding, and installed new window treatments for both function and style. These finishing touches helped define the space and give it a custom-built feel.
Key Additions:
- Custom built-in shelves for storage and display
- Crown molding for an upscale look
- Layered curtains with blackout lining for privacy and insulation
This step-by-step process laid a solid foundation for our living room’s stunning transformation. Each change brought us closer to turning a drab space into something truly fabulous.
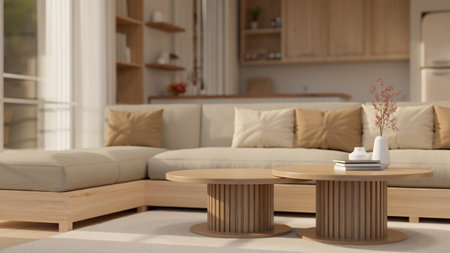
4. The Big Reveal
Now for the moment weve all been waiting for—the big reveal! The living room has undergone a complete transformation, turning from a dull, outdated space into a warm, stylish, and inviting area that truly feels like home.
Before & After Comparison
| Before | After |
|---|---|
| Beige walls with minimal lighting | Soft gray tones with layered lighting |
| Old, mismatched furniture | Modern sectional with coordinated accent chairs |
| Cluttered layout and limited seating | Open-concept arrangement with improved flow |
| No focal point or visual interest | Statement fireplace wall with mounted TV and artwork |
Furniture & Layout Enhancements
The new furniture selection includes a large L-shaped sofa in a neutral tone, paired with two mid-century modern armchairs that add character and comfort. A sleek coffee table anchors the seating area, while a plush area rug defines the space. We also optimized the layout to make the room feel more open and functional, allowing easy movement between the living room and adjacent areas.
Dramatic Lighting Improvements
Lighting played a huge role in this remodel. We replaced the single overhead fixture with recessed ceiling lights for even illumination. Added wall sconces and a stylish floor lamp create layers of light that can be adjusted for any mood—whether youre hosting guests or enjoying a cozy night in.
Décor Details That Pop
Thoughtful touches like abstract wall art, textured throw pillows, and indoor plants bring life and personality to the room. Floating shelves display curated décor items without overwhelming the space. Every element was chosen to create balance, warmth, and style.
Key Décor Elements at a Glance:
- L-shaped modern sofa in soft gray fabric
- Wood-and-metal coffee table with clean lines
- Area rug in muted geometric pattern
- Layered lighting: recessed lights, sconces, floor lamp
- Pops of color through cushions and wall art
- Natural greenery with low-maintenance houseplants
This living room makeover is proof that thoughtful design choices and smart updates can breathe new life into any space.
5. Final Touches & Styling Tips
Now that the major renovation work is done, its time to bring the space to life with final touches and smart styling choices. These are the details that truly take your living room from drab to fab—adding warmth, personality, and that polished look you see in designer homes.
Layering Accessories for a Lived-In Look
Accessories are like jewelry for your home—they add sparkle and style when used thoughtfully. Heres how we layered in personality during our remodel:
- Pillows & Throws: Mixing different textures (like velvet, knit, and linen) added depth and comfort to the sofa.
- Artwork: A large statement piece above the couch became a focal point. We also created a mini gallery wall using framed prints and family photos.
- Rugs: A patterned area rug helped define the seating area and added color without overwhelming the space.
- Curtains: Floor-length curtains in a neutral tone gave height to the room and softened hard edges.
Finishing Touches That Pull It All Together
The little things matter more than you think. Here are some of the finishing elements we used to complete the look:
| Element | Description | Why It Works |
|---|---|---|
| Coffee Table Books | A stack of two or three stylish books with interesting covers | Adds visual interest and sparks conversation |
| Greenery | Potted plants and small succulents placed throughout | Brings life and freshness into the room |
| Candles & Trays | Scented candles on decorative trays | Adds scent, ambiance, and an intentional design element |
| Lamps & Lighting | Table lamps and floor lamps with warm-toned bulbs | Makes the space feel cozy during evening hours |
Design Hacks You Can Try at Home
If youre working on your own living room makeover, here are some easy design hacks we used that can make a big difference without breaking the bank:
- Use Removable Wallpaper: Great for accent walls—adds pattern without commitment.
- Swap Out Hardware: Changing drawer pulls or cabinet knobs gives furniture an instant upgrade.
- Create Symmetry: Matching table lamps or paired chairs provide visual balance thats pleasing to the eye.
- Mix High & Low: Combine investment pieces (like a quality sofa) with budget finds (like thrifted decor) for a curated look.
- Add Personal Touches: Display books you love, travel souvenirs, or DIY art to make it feel like home.
Your Turn!
The magic is in the mix—don’t be afraid to combine old and new, classic and trendy, bold and subtle. The goal is to create a space that feels both beautiful and uniquely yours. With a few thoughtful accessories and clever styling tricks, you can completely transform your living room just like we did—from drab to fab!
6. What We Learned
Remodeling our living room from a dull, outdated space to a stylish and comfortable hub was more than just picking out new furniture or changing paint colors. Along the way, we picked up some valuable lessons that we’ll definitely carry into any future renovation projects. Here’s what stood out the most:
Budgeting: Expect the Unexpected
No matter how well you plan your budget, surprises will happen. We thought we had everything accounted for, but once demolition started, we found hidden issues like outdated wiring and uneven flooring that added extra costs.
Top Budgeting Tips
| Lesson | What We’d Do Differently |
|---|---|
| Add a Buffer | Include at least 15-20% contingency in your budget for unexpected expenses. |
| Track Every Dollar | Use a spreadsheet or app to monitor spending in real time. |
| Prioritize Spending | Decide what matters most—whether it’s high-end finishes or functional upgrades—and allocate funds accordingly. |
Contractor Coordination is Key
A smooth remodel depends heavily on good communication with your contractors. We learned early on that assumptions lead to delays and missteps. Clear expectations, regular check-ins, and written agreements made all the difference.
Helpful Contractor Communication Tips
- Create a Timeline: Have your contractor provide a detailed schedule and update it weekly.
- Document Everything: Keep emails and texts organized so you can refer back if any issues arise.
- Ask Questions: Don’t be afraid to speak up if something doesn’t look right or make sense.
The Power of Patience and Flexibility
No matter how eager you are to finish, good things take time. Shipping delays, weather conditions, and decision fatigue can stretch your timeline. Staying flexible helped us stay sane—and make better choices along the way.
A Few Things We’d Keep in Mind Next Time:
- Pace Yourself: Avoid rushing decisions; take breaks if needed to avoid burnout.
- Be Open-Minded: Sometimes the original plan isn’t the best one—stay open to suggestions from pros.
- Celebrate Small Wins: Every step forward is progress worth recognizing!
This remodel taught us more than how to decorate—it showed us how to plan smarter, communicate better, and enjoy the process, even when things don’t go exactly as planned.