1. Planning Your Patio Project
Before you start your DIY patio paver installation, it’s crucial to spend time planning your project for the best results. Begin by assessing your outdoor space—take note of the sun patterns, existing landscaping, and how you envision using the area. Are you looking for a cozy spot for morning coffee, a space to entertain friends, or an outdoor dining zone? Next, decide on a layout that maximizes functionality and complements your home’s architecture. Sketch out potential shapes and sizes, keeping pathways and furniture placement in mind. Finally, choose the right paver style that not only matches your home’s exterior but also fits your lifestyle needs. Whether you prefer classic brick, modern concrete, or natural stone, selecting the right materials will enhance curb appeal and ensure durability. Taking these steps will set a solid foundation for a successful patio transformation.
Gathering Tools and Materials
Before you jump into your patio paver installation, it’s essential to gather all the necessary tools and materials. Having everything ready will streamline your workflow and help avoid frustrating delays. Here’s a comprehensive checklist to ensure you’re fully prepared:
Essential Tools for DIY Paver Installation
| Tool | Purpose | Where to Source |
|---|---|---|
| Shovel | Excavating soil and spreading base materials | Hardware store, home improvement centers |
| Wheelbarrow | Transporting materials like gravel and sand | Home Depot, Lowe’s, or rental shops |
| Tamper or Plate Compactor | Packing the base material for stability | Purchase or rent from tool rental outlets |
| Level | Ensuring an even surface throughout the project | Local hardware stores or online retailers |
| Tape Measure | Measuring distances and layout accuracy | Any home improvement store |
| Rubber Mallet | Tapping pavers into place without damaging them | Hardware store or tool supply shop |
| Broom | Sweeping sand into joints between pavers at the end of the project | Household goods stores or supermarkets |
| Masonry Saw (optional) | Cutting pavers to fit edges and corners precisely | Rent from tool rental businesses if needed |
Main Materials Checklist
| Material | Description & Tips for Sourcing |
|---|---|
| Paver Stones/Bricks | Select your preferred style, size, and color. Visit local landscape suppliers or big-box stores for a wide variety. Buy about 10% extra to allow for cuts and replacements. |
| Paver Base (Crushed Stone/Aggregate) | This forms the stable foundation for your patio. Source from garden centers, landscaping supply yards, or home improvement warehouses. Quantity depends on patio size and recommended depth (usually 4-6 inches). |
| Paver Sand (Leveling Sand) | This layer sits on top of the base to create a smooth bed for the pavers. Ask for “paver sand” or “concrete sand” at local suppliers. |
| Paver Edging/Restraints | Keeps your design in place and prevents shifting over time. Find durable plastic or metal edging at hardware stores. |
| Polymeric Joint Sand | Swept between pavers at the end, this special sand locks them together and helps prevent weeds. Available at most stores selling hardscape supplies. |
| Landscape Fabric (optional) | A weed barrier beneath your base materials can help keep your patio low-maintenance. Purchase rolls from any garden center. |
Pro Tip:
Create a dedicated staging area near your project site to store all materials and tools before breaking ground. This keeps your installation efficient and organized!
Double-Check Before Starting:
Once you’ve sourced everything on your list, lay out your tools and do a final inventory check. Missing something? Now’s the time to grab it—once you start digging, you’ll want every step to flow smoothly!

3. Preparing the Patio Area
Before you get started with laying any pavers, its crucial to prepare your patio area properly for lasting results. First, outline your patio using stakes and string or a garden hose to define the exact shape and size you want. This step ensures your paver layout is accurate and helps you visualize the final product, making it easy to adjust before any heavy work begins.
Excavate the Area
Once your patio outline is set, its time to excavate the area. Use a shovel or rent a sod cutter to remove grass, roots, and soil within your marked boundaries. Typically, youll want to dig down about 6 to 8 inches to make room for both your base material and the pavers themselves. Remember: removing enough soil is key so your finished patio will sit flush with the surrounding yard, creating a seamless transition.
Establishing a Solid Foundation
The next step is to establish a solid foundation. Lay down a layer of landscape fabric to prevent weeds from growing up through your pavers. Then, fill the excavated area with 4-6 inches of crushed gravel or stone. This forms the stable base that supports your patio for years to come.
Proper Grading for Drainage
Don’t forget about proper grading for drainage. Your base should slope away from your house at about 1/4 inch per foot. This subtle angle ensures rainwater drains off instead of pooling on your new patio or seeping toward your homes foundation. Take your time with this step—good drainage now means fewer headaches later!
4. Laying the Base and Pavers
Now that your patio area is properly prepped, its time to create a solid foundation for your pavers. This step is crucial for ensuring long-term durability and a professional finish. Follow these steps to get it right:
Spread the Gravel Layer
Start by pouring a 4-6 inch layer of crushed gravel across the entire excavated area. Use a landscaping rake to level the gravel, making sure it’s evenly distributed. Compact the gravel using a plate compactor or hand tamper—this creates a stable base that prevents shifting over time.
Apply the Sand Bedding
Next, add a 1-inch layer of coarse sand on top of the compacted gravel. Screed the sand with a straight board to ensure an even, smooth surface. The sand layer acts as a cushion and helps you adjust each paver for perfect alignment.
| Layer | Recommended Thickness | Purpose |
|---|---|---|
| Gravel Base | 4-6 inches | Drainage & Stability |
| Sand Bedding | 1 inch | Paver Adjustment & Leveling |
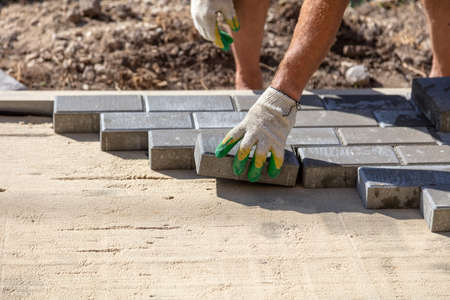
Arrange Your Pavers
Begin laying pavers from one corner, usually starting at the longest straight edge of your patio design. Place each paver carefully into position, leaving consistent gaps—typically 1/8 to 1/4 inch—for joint sand later. Use spacers if needed to keep spacing uniform and check alignment frequently with a string line or level for that flawless pro look.
If you need to cut any pavers to fit edges or curves, use a masonry saw or paver splitter for clean results. As you work, stand on the already laid pavers instead of the sand bed to avoid disturbing your leveled surface.
5. Finishing Touches and Maintenance Tips
Fill Gaps with Joint Sand
Once all your pavers are set in place, it’s time to lock everything together by sweeping joint sand into the gaps. Use polymeric sand for the best results—it hardens when wet, helping prevent weeds and insect invasion. Pour the sand over your patio, sweep it into every joint using a push broom, and make sure it settles evenly between each paver. Don’t forget to lightly mist the surface with water so the polymeric sand can activate and bond your project together.
Clean Up for a Polished Look
To showcase your handiwork, give your new patio a thorough cleaning. Use a leaf blower or broom to remove any excess sand from the surface of the pavers before misting with water. For stubborn spots or construction dust, hose down the area or use a gentle setting on a power washer. Keeping your patio surface clean not only enhances curb appeal but also helps spot potential maintenance needs early.
Easy Patio Upkeep Tips
Seal and Protect
To extend the life of your patio pavers and keep colors vibrant, consider applying a quality sealer every couple of years. This extra step protects against stains, fading from UV rays, and freeze-thaw cycles during colder months.
Regular Checks Go a Long Way
Inspect your patio periodically—especially after heavy rain or winter weather. Sweep away debris, check for shifting pavers, and top up joint sand if necessary. Promptly address any settling or weed growth to keep your outdoor space looking fresh year-round.
Your Outdoor Investment, Maximized
With these finishing touches and simple maintenance habits, you’ll enjoy a beautiful DIY patio that stands the test of time—and adds true value to your home’s outdoor living experience.