Choosing the Right Removable Wallpaper
When youre renting an apartment in the U.S., one of the easiest ways to personalize your space is by using removable wallpaper. However, not all wallpapers are created equal, and choosing the right one can make all the difference for both style and ease of removal when your lease ends. Here are some tips on selecting renter-friendly wallpaper that meets American apartment regulations and suits your lifestyle.
Consider Material Quality
Look for high-quality peel-and-stick wallpapers made from vinyl or fabric. These materials are not only durable but also less likely to damage painted surfaces or leave residue when removed. Avoid wallpapers that require additional adhesive, as these can be tricky to uninstall and may violate your rental agreement.
Match Your Style
Removable wallpaper comes in a wide range of patterns and colors, from bold geometrics to subtle florals. Consider what will work best with your existing furniture and lighting. In many American apartments, neutral tones or trendy patterns like shiplap, brick, or botanical prints are popular choices that add personality without overwhelming small spaces.
Check Apartment Regulations
Before making a purchase, review your lease or talk with your landlord about any restrictions regarding wall treatments. Many property managers in the U.S. allow temporary decor like removable wallpaper, but its wise to get written approval just in case. Opt for products specifically labeled as “renter-friendly” or “easy peel,” which are designed to come off cleanly and meet most rental requirements.
Sample Before You Commit
Order samples first to see how the wallpaper looks under your apartments lighting and against your walls. This step can help you avoid costly mistakes and ensure that you’re happy with both the look and feel of your chosen design.
2. Gathering Tools and Preparing Your Space
If you want your removable wallpaper to look flawless and stay put, starting with the right tools and a clean workspace is key. Renters often worry about causing damage, but proper prep helps prevent headaches when it’s time to move out.
Essential Tools for Removable Wallpaper Installation
| Tool | Purpose |
|---|---|
| Tape Measure | For measuring wall dimensions accurately. |
| Level or Laser Level | Keeps your wallpaper lines straight and even. |
| Pencil | Marking guidelines (use lightly to avoid marks). |
| Smoothing Tool or Plastic Squeegee | Removes air bubbles and ensures good adhesion. |
| Utility Knife or Precision Blade | Trims excess wallpaper neatly at edges and corners. |
| Step Ladder | Helps you reach higher spots safely. |
| Microfiber Cloth or Sponge | Cleans walls before application. |
| Mild Soap & Water | For prepping walls; avoid harsh chemicals. |
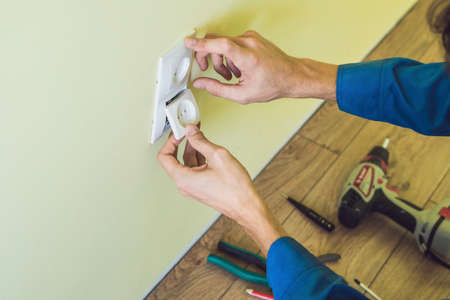
Prepping Your Rental Walls: Step-by-Step Guide
- Remove Wall Decor: Take down any art, hooks, or nails so your surface is clear.
- Clean Thoroughly: Use a damp microfiber cloth with mild soap and water to wipe away dust, oils, and dirt. Let the walls dry completely before starting.
- Fix Imperfections: Fill small holes with spackle if allowed by your lease. Lightly sand rough patches for a smoother finish.
- Check Paint Type: Wallpaper sticks best to eggshell, satin, or semi-gloss paints. If your walls are freshly painted, wait at least 30 days before applying wallpaper to avoid peeling issues.
- Mark Guidelines: Use a tape measure, level, and pencil to create light vertical lines as guides—this helps keep your panels straight during installation.
- Protect Floors & Outlets: Lay down a drop cloth or old sheet beneath your work area, and use painter’s tape around outlets or trim if needed for extra caution.
Avoiding Common Pitfalls
A little prep goes a long way! Taking these steps ensures your removable wallpaper adheres smoothly without damaging your rental’s walls—so you can enjoy a stylish upgrade that’s truly temporary.
3. Step-by-Step Installation Guide
Installing removable wallpaper is a renter-friendly way to give your space a fresh look without causing any damage. Follow these clear steps for a smooth application, along with real-life tips and troubleshooting advice to help you avoid common pitfalls.
Gather Your Materials
Before you start, make sure you have everything you need: removable wallpaper rolls, a measuring tape, level, pencil, sharp utility knife or scissors, smoothing tool (like a plastic card or squeegee), and a clean cloth. Having all supplies ready will save you time and frustration.
Prepare the Surface
Wipe down your walls with a damp cloth to remove dust and debris. Let them dry completely. For best results, apply wallpaper to smooth, clean surfaces—textured or dirty walls can prevent proper adhesion.
Measure and Plan
Measure the height and width of your wall to calculate how many wallpaper panels youll need. Mark a straight vertical line on the wall using a level and pencil as your starting guide; this ensures your first panel goes on straight. Pro tip: Always start in the most visible corner for the best finished look.
Apply the Wallpaper
Peel back a small section of the backing paper and align the top of your first panel with your pencil line. Smooth it onto the wall gradually, peeling more of the backing as you go. Use your smoothing tool to press out any air bubbles or wrinkles from the center outward. If you make a mistake, gently peel back and reposition—the beauty of removable wallpaper is its flexibility.
Troubleshooting Common Issues
- Air Bubbles: Use your smoothing tool to push bubbles toward the edge. For stubborn bubbles, lift that section and reapply.
- Mismatched Patterns: Always check pattern alignment before sticking each panel. If panels don’t match up, peel back and adjust while the adhesive is still fresh.
- Corners & Outlets: Use scissors or a utility knife to trim excess wallpaper around corners or outlets for a custom fit.
Real-Life Example
If you’re installing wallpaper behind your couch in a rented apartment, try cutting panels slightly longer than needed so you can trim them precisely at baseboards and ceilings. This gives a neat finish and avoids exposing gaps if your walls aren’t perfectly square—a common scenario in older American rentals.
With patience and careful preparation, even beginners can achieve professional-looking results with removable wallpaper—all without risking your security deposit!
4. Everyday Maintenance and Cleaning Tips
Keeping your removable wallpaper looking fresh is essential, especially in a rental where you want to preserve both your deposit and your style. The good news is that with the right approach, maintaining removable wallpaper is simple and affordable. Here’s how to keep your walls looking great without risking damage.
Gentle Cleaning for Lasting Freshness
Removable wallpaper is designed to be easy-care, but it still needs some attention to stay in top shape. Always start by dusting your wallpaper regularly with a soft microfiber cloth or a duster. This helps prevent buildup from everyday dust and air particles, which can dull colors over time. For more stubborn marks—like fingerprints or smudges—a damp sponge or cloth works well. Remember to wring out excess water before wiping; too much moisture can weaken the adhesive and cause edges to peel.
Recommended Cleaning Products
| Product Type | Safe to Use? | Notes |
|---|---|---|
| Mild Dish Soap Solution | Yes | Mix a drop with water for gentle spot cleaning |
| Microfiber Cloth | Yes | Great for dusting and gentle wiping |
| Magic Eraser (light use) | Cautiously | Test on hidden area first; may cause fading if rubbed hard |
| Abrasive Cleaners/Bleach | No | Can discolor or damage wallpaper surface and adhesive |
| Spray Cleaners with Ammonia/Alcohol | No | May break down adhesive and ruin print quality |
What to Avoid for American Rental Spaces
Avoid scrubbing with rough sponges, scouring pads, or anything abrasive as these can scratch the surface of your wallpaper. Also, steer clear of chemical cleaners like bleach or ammonia-based sprays—they can discolor the design and compromise the sticky backing, making removal messy when it’s time to move out.
Quick Maintenance Routine for Renters:
- Weekly: Dust all wallpapered areas with a microfiber cloth.
- Monthly: Spot clean any visible marks using a mild soap solution and damp cloth.
- As Needed: Gently press down any corners or seams that begin to lift—especially in high-traffic areas or humid environments like bathrooms.
A consistent cleaning routine not only keeps your removable wallpaper looking sharp but also ensures you get your security deposit back at move-out. With these easy steps, renters across America can enjoy their personalized space without worry.
5. Easy and Damage-Free Removal
One of the biggest advantages of removable wallpaper for renters is how simple it is to take down when your lease ends. Landlords in the U.S. expect their rental units to be returned in nearly the same condition as when you moved in, so proper removal is key to getting your full security deposit back. To start, gently peel a corner of the wallpaper with clean, dry hands—avoid using sharp tools that could scratch or gouge the wall. Slowly pull the wallpaper downward at a 45-degree angle; this helps prevent tearing and minimizes stress on the paint underneath. If you encounter any resistance or sticky spots, use a damp microfiber cloth to slightly moisten the area, loosening the adhesive without soaking the wall. After all panels are removed, inspect the walls for any leftover residue. Most U.S.-approved removable wallpapers are designed to leave minimal adhesive behind, but if you notice any, use a mild soap-and-water solution or gentle adhesive remover approved for painted surfaces. Finish by wiping down the walls and letting them air dry completely. Taking your time with removal not only protects your security deposit, but also ensures a smooth transition for both you and your landlord.
6. Budget-Friendly Decorating Ideas
Removable wallpaper isn’t just a smart choice for renters—it’s also a budget-friendly way to inject personality into your home without overspending. There are countless creative ways to use peel-and-stick wallpaper beyond the obvious accent wall. For example, you can cut leftover wallpaper into shapes or strips and use them to line bookshelves, drawers, or the back panels of cabinets, instantly adding color and style to unexpected places. If you’re looking for a trendy update, try using removable wallpaper as a backsplash in your kitchen or bathroom; it’s much cheaper than tile and just as eye-catching. Temporary wallpaper is also perfect for customizing furniture—wrap it around dresser drawers, side tables, or even as a headboard feature for a unique look that’s easy to change when your tastes evolve or when it’s time to move out.
Mix Patterns on a Dime
Don’t be afraid to play with patterns! Since peel-and-stick wallpaper is so easy to remove, you can experiment by mixing different designs in small doses—think geometric prints on one wall with subtle textures on another. Shopping off-season sales or buying smaller rolls allows you to test out several looks without making a huge investment.
Use Wallpaper as Art
If you’re not ready to commit to an entire wall, frame sections of removable wallpaper as DIY artwork. This gives your space a designer touch while staying well within your decorating budget. You can swap out patterns seasonally or whenever inspiration strikes, keeping your rental fresh and inviting year-round.
Host a Wallpaper Swap
Get together with friends or neighbors who also use removable wallpaper and organize a swap. Trading leftover pieces is an eco-friendly and wallet-friendly way to refresh your décor—and you might discover new styles you wouldn’t have tried otherwise!
With just a little creativity and planning, removable wallpaper opens up endless possibilities for affordable personalization. Whether you’re adding pops of color, creating statement accents, or simply covering up bland rental walls, these ideas make it easy for renters to transform their space without breaking the bank.