Assessing the Damage
Before you start repairing your walls, its important to properly assess the type and extent of the damage. This will help you choose the right materials and methods for a long-lasting fix. In American homes, drywall is the most common wall surface, and it can develop several types of minor imperfections over time.
Common Types of Wall Imperfections
| Type | Description | Typical Causes |
|---|---|---|
| Nail Pops | Small, circular bumps or holes where nails or screws have pushed through or sunk back into the drywall. | Natural settling of the house, temperature changes, or improper installation. |
| Dents | Shallow depressions or indents in the wall surface, often less than an inch wide. | Accidental impact from furniture, doors, or everyday activity. |
| Minor Cracks | Thin lines running across the wall, typically less than 1/8 inch wide. | House settling, humidity changes, or slight foundation movement. |
How to Identify Each Imperfection
- Nail Pops: Look for raised or sunken spots where fasteners are visible or paint has cracked in a small circle. Lightly run your hand over suspicious areas to feel for bumps or dips.
- Dents: These are usually easy to spot visually but can also be felt by gently sliding your palm along the wall. Dents might catch dust and appear darker than surrounding areas.
- Minor Cracks: Look for thin, jagged lines that often appear near corners, windows, doors, or ceilings. Use a flashlight to better see hairline cracks in low light conditions.
Deciding on Your Repair Approach
The best repair method depends on the type and size of the imperfection:
| Imperfection Type | Best Repair Approach |
|---|---|
| Nail Pops | Remove loose material, secure drywall if necessary, and patch with joint compound. |
| Dents | Fill with spackling paste or lightweight joint compound; sand smooth when dry. |
| Minor Cracks | Tape (if needed) and cover with joint compound; feather out edges for a seamless finish. |
Tip:
If youre unsure about what kind of damage you have, take a clear photo and ask at your local hardware store—staff are usually happy to help identify common issues found in American homes.
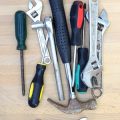
2. Getting the Right Tools and Materials
Before you start fixing nail pops, dents, or small wall imperfections, it’s important to gather all the right tools and materials. Having everything ready will make the job smoother and help you achieve a professional-looking finish. Below is a table with some of the most commonly used supplies for repairing drywall in American homes:
| Tool/Material | Purpose |
|---|---|
| Spackle or Joint Compound | Fills holes, dents, and surface imperfections |
| Putty Knife (2-6 inch) | Applies spackle smoothly over repairs |
| Sandpaper (120-220 grit) | Sands patched areas for a seamless blend with the wall |
| Patching Mesh or Tape | Reinforces larger holes or cracks before applying compound |
| Damp Cloth or Sponge | Cleans dust off surfaces before and after sanding |
| Primer | Seals repaired spots to prevent paint flashing or unevenness |
| Paint & Paintbrush/Roller | Matches the wall’s color and texture after repairs are done |
| Screwdriver or Hammer | Resets popped nails or screws flush into studs if needed |
| Utility Knife | Cuts away loose drywall paper or trims edges of damaged area |
Tips for Choosing Supplies at American Hardware Stores:
- Spackle vs. Joint Compound: For small jobs like nail pops and minor dents, lightweight spackle is quick-drying and easy to sand. For slightly larger repairs, use joint compound.
- Putty Knives: A flexible 2-inch knife is great for tight spaces; wider ones help feather out bigger patches.
- Patching Mesh: Look for self-adhesive mesh tape in the drywall section—it’s handy for reinforcing cracks or bigger holes.
- Sandpaper: Fine-grit sandpaper gives you that smooth finish you’ll need before painting.
- Paint Matching: Bring a sample of your existing wall color to your local paint store if you’re unsure about the shade.
Safety Gear (Optional but Recommended):
- Dust Mask: Protects your lungs from sanding dust.
- Safety Glasses: Shields eyes from flying debris while scraping or sanding.
- Gloves: Keeps your hands clean when working with compounds and paint.
Pro Tip:
If this is your first time patching walls, grab a practice board or test spot on an inconspicuous area. This way, you’ll get comfortable using your tools and materials before working on more visible spots in your home.

3. Repairing Nail Pops and Dents
Step-by-Step Instructions for Fixing Nail Pops
Nail pops are common in American homes, especially in drywall construction. They happen when the nails or screws used to fasten drywall shift, causing a bump or circular crack on the wall surface. Here’s how you can fix them for a smooth and lasting finish:
What You’ll Need
| Tool/Material | Purpose |
|---|---|
| Hammer & drywall screws | Secure loose drywall |
| Screwdriver or drill | Drive screws into studs |
| Putty knife (4-6 inch) | Apply joint compound smoothly |
| Joint compound (pre-mixed or powder) | Fill and smooth over imperfections |
| Sandpaper (120-150 grit) | Smooth patched area |
| Damp sponge or cloth | Clean dust before painting |
| Primer & matching paint | Finish and blend repair area |
How to Fix Nail Pops: Step by Step
- Secure the Drywall: If the nail is sticking out, gently tap it back in with a hammer. For better results, drive a drywall screw about 1-2 inches above and below the nail pop to anchor the drywall firmly to the stud.
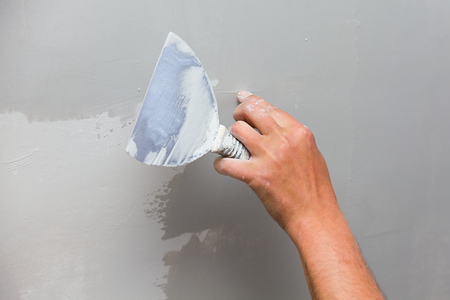
- Remove Loose Material: Scrape away any cracked paint or drywall around the nail pop using your putty knife.
- Apply Joint Compound: Spread a thin layer of joint compound over the area, covering both the old pop and new screw heads. Feather out the edges for a smooth blend.
- Let It Dry: Allow the compound to dry completely (usually a few hours, check manufacturer’s instructions).
- Sand Smooth: Lightly sand the dried compound until flush with the wall surface. Use a damp sponge to wipe away dust.
- Add a Second Coat (if needed): For deeper pops, apply a second coat of compound, let it dry, and sand again.
- Prime & Paint: Apply primer to the repaired area, then touch up with matching wall paint for a seamless finish.
Treating Wall Dents and Small Imperfections
Dent Repair Made Easy: A Quick Guide
| Dent Size/Type | Best Repair Method |
|---|---|
| Tiny dings (pinholes, minor scuffs) | Lightweight spackle; quick touch-up with putty knife; sand and repaint. |
| Larger dents (quarter-sized or bigger) | Use joint compound; build up layers if needed; sand between coats; prime and paint. |
| Dents from door handles/furniture bumps | Add a self-adhesive mesh patch for extra strength under joint compound if needed. |
Quick Steps for Dents:
- Clean Area: Remove dust or loose material from the dented spot.
- Fill Dent: Use spackle or joint compound with your putty knife. Press firmly so it fills in completely.
- Smooth & Dry: Level off excess material. Let dry according to product instructions.
- Sand: Gently sand flush with surrounding wall. Wipe away dust with a damp cloth.
- Paint Touch-Up: Prime if necessary, then repaint for an invisible repair.
Tackling nail pops and dents is simple with these steps—no need to call in a pro for minor wall fixes! With some basic tools and materials, you can restore your walls to like-new condition quickly and efficiently.
4. Finishing and Sanding the Surface
Once you’ve patched nail pops, dents, or other minor wall imperfections, it’s time to make sure your repair blends in perfectly with the rest of your wall. Finishing and sanding are key steps that help create a smooth, seamless surface—no one will ever know there was a repair! Here’s how to get it right:
Let the Patch Dry Completely
Before you start sanding, make sure the patching compound or spackle is fully dry. Depending on the product and thickness, this can take anywhere from a couple of hours to overnight. If you sand too soon, you’ll end up with a rough finish.
Gather Your Sanding Supplies
| Tool | Best For |
|---|---|
| Sanding Sponge | Small patches and rounded corners |
| Fine-Grit Sandpaper (120-220 grit) | Smoothing patched areas |
| Pole Sander | Larger wall surfaces |
| Dust Mask & Safety Glasses | Protecting yourself from dust |
How to Sand the Patched Area
- Start with fine-grit sandpaper (120-150 grit) for initial smoothing.
- Use light, circular motions to feather the edges of the patched area into the surrounding wall.
- If needed, switch to an even finer grit (180-220) for a final pass to get a flawless finish.
- Run your hand over the area to check for bumps—if you feel any rough spots, keep sanding lightly until it’s even.
Troubleshooting Common Issues
| Issue | Solution |
|---|---|
| Patching compound crumbles or flakes off while sanding | The patch wasn’t fully dry; let it cure longer next time. |
| The patched area feels lower than the wall surface | Add another thin layer of compound, let dry, then sand again. |
| You can still see the patch outline after sanding | Feather out further with sandpaper and consider a skim coat if needed. |
Wipe Down Before Painting
After sanding, use a slightly damp cloth or tack cloth to wipe away all dust. This helps paint stick better and ensures a smooth finish.
Pro Tip: Blend With Texture if Needed
If your walls have texture (like orange peel or knockdown), try dabbing the patched spot with a damp sponge or using spray-on texture before painting. This helps disguise the repair even more.
5. Priming and Painting for a Perfect Match
Getting Ready: Why Primer Matters
After you’ve repaired nail pops, dents, or other small wall imperfections, the next step is to make sure your patch blends in seamlessly with the rest of your wall. Using primer isn’t just an extra step—it’s essential for a smooth, even finish. Primer helps seal the repaired area, prevents stains from bleeding through, and ensures your paint sticks properly.
Tips for Applying Primer
- Choose the Right Primer: For most drywall repairs, a standard water-based or latex primer works well. If you used joint compound, look for a “stain-blocking” or “high-hide” primer.
- Apply Evenly: Use a small brush or roller to cover just the repaired spot and a little beyond. Feather out the edges to blend with the existing wall surface.
- Let It Dry: Always let the primer dry completely before painting—usually about 1 hour (check the can for specifics).
Selecting and Applying Paint
Matching your wall color can be tricky, especially if it’s been a while since you last painted. Here’s how to get as close as possible:
| Tip | Description |
|---|---|
| Bring a Chip | If possible, peel off a small paint chip from an inconspicuous spot and take it to your local hardware store for color matching. |
| Check Leftover Paint | If you have leftover paint from your last project, use it! Just stir it thoroughly before applying. |
| Use Quality Tools | A good angled brush or foam roller helps blend new paint into old. Avoid cheap brushes that leave streaks. |
| Test First | Always test paint on a small area to make sure it matches when dry—colors can look different wet versus dry. |
Blending Repairs Into Existing Texture and Color
- Feather Your Edges: When painting over repairs, extend your strokes a few inches beyond the patched spot and lightly blend outward. This softens any noticeable lines between new and old paint.
- Mimic Wall Texture: If your walls have texture (like orange peel or knockdown), try to recreate this using spray texture products or by dabbing on joint compound with a sponge before priming and painting.
- Consider Sheen: Walls are usually eggshell or satin finish in living spaces—make sure your touch-up paint matches the original sheen for best results.
Quick Checklist for Seamless Repairs
- Prime all repaired areas before painting
- Color match as closely as possible (bring samples if needed)
- Blend new paint into old using overlapping brush/roller strokes
- Mimic original wall texture if necessary before painting
- Let everything dry fully between steps for the cleanest look
Your patched wall should now look as good as new—no one will know there was ever a flaw!