Bold Accent Walls
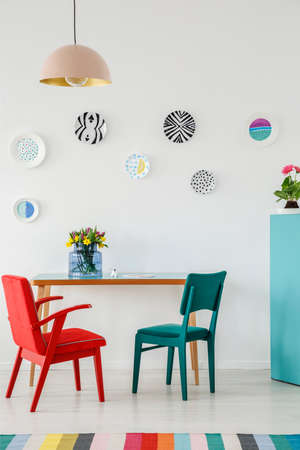
Creating a designer-inspired space doesn’t have to come with a high price tag, and one of the most cost-effective ways to elevate any room is with a bold accent wall. Accent walls are all about making a statement with color, drawing attention to a specific area, and adding personality without overwhelming the entire space. The trick is in selecting the right shade and placing your accent wall strategically for maximum impact.
How to Choose Statement Colors
When choosing an accent color, think beyond basic neutrals. Look for hues that complement your existing decor but still provide a pop of interest. Deep navy, emerald green, rich terracotta, or even a modern charcoal can add sophistication. If you’re unsure which color will work best, consider the mood you want to create: warm colors like red and orange energize, while cooler tones like blue and green bring calmness.
| Room Type | Recommended Accent Colors | Mood Created |
|---|---|---|
| Living Room | Navy, Charcoal, Olive Green | Cozy & Inviting |
| Bedroom | Soft Blue, Sage, Dusty Pink | Relaxing & Serene |
| Dinning Room | Deep Red, Terracotta, Mustard Yellow | Warm & Welcoming |
| Home Office | Teal, Slate Blue, Forest Green | Focused & Productive |
Where to Place Accent Walls for Maximum Visual Impact
The placement of your accent wall can make or break its effectiveness. In American homes, popular choices include the wall behind a bed’s headboard in the bedroom or the wall behind the sofa in the living room. For open-concept spaces, consider using an accent wall to define areas—like creating a visual separation between dining and living zones. Avoid placing accent walls on random short walls or where there’s little natural light; instead, highlight architectural features such as fireplaces or built-in shelving for a designer touch.
Accent Wall Placement Tips:
- Main Focal Point: Choose the first wall you see when entering the room.
- Avoid Clutter: Skip walls with too many doors or windows.
- Balance: Ensure your accent wall isn’t competing with other bold elements in the room.
- Cohesion: Tie in decor accents (like pillows or rugs) with your chosen paint color for a cohesive look.
Pro Tip:
If you’re nervous about commitment, try painting half-walls or geometric shapes with painter’s tape for a modern twist that’s easy to update later. With just a gallon of paint and thoughtful placement, you can achieve a high-end look on a budget.
2. DIY Geometric Patterns
If you want to give your walls a designer-inspired look without breaking the bank, geometric paint patterns are an easy and affordable solution. With just some masking tape, patience, and a few basic painting supplies, you can transform any space with modern, eye-catching designs that feel fresh and unique. The beauty of this technique is its versatility—you can customize colors, shapes, and layouts to suit your personal style or match your existing décor.
How to Get Started with Masking Tape
All you need are some quality painter’s tape, a level or ruler, your chosen paint colors, and a steady hand. First, map out your design on the wall using light pencil marks or chalk lines as guides. Next, carefully apply the masking tape along those lines to create crisp edges for your shapes—think triangles, hexagons, stripes, or even random abstract forms. Make sure the tape is pressed down firmly to prevent paint from bleeding underneath.
Popular Geometric Pattern Ideas
| Pattern Type | Description | Design Tips |
|---|---|---|
| Chevron | Zig-zag stripes that add dynamic movement | Use bold contrasting colors for maximum impact |
| Hexagon Honeycomb | Creates a trendy, modern look with repeating hexagons | Stick with soft tones for a subtle effect or go bright for drama |
| Diagonal Stripes | Sleek lines running at an angle across the wall | Alternate thick and thin stripes for added interest |
Pro Tips for Clean Lines and Lasting Results
- Always remove the tape while the paint is still slightly wet for sharper lines.
- Use high-quality painter’s tape made specifically for delicate surfaces to avoid peeling existing paint.
- If working with multiple colors, allow each section to dry fully before taping off adjacent areas.
This simple DIY approach brings instant personality to any room—from living rooms and bedrooms to entryways and home offices—without the hefty price tag of custom wallpaper or professional muralists. All it takes is a little creativity and careful prep work to achieve a high-end designer vibe at a fraction of the cost.
3. Textured Paint Techniques
If you want to give your walls a designer look without the designer price tag, textured paint techniques are a fantastic option. Adding depth and tactile interest to your space can be surprisingly affordable, especially if you’re willing to try a few DIY methods. Popular approaches like sponging, rag-rolling, and faux concrete finishes are easy to achieve with basic tools and a little creativity.
Affordable Texturing Methods
| Technique | What You Need | Best For | Estimated Cost |
|---|---|---|---|
| Sponging | Sponge, latex paint, tray | Subtle, cloud-like texture; accent walls | $20-$40 (materials only) |
| Rag-Rolling | Cotton rag, glaze or diluted paint, gloves | Soft, marbled effects; living rooms or bedrooms | $15-$35 (materials only) |
| Faux Concrete Finish | Trowel or putty knife, gray paint, sealer (optional) | Modern industrial vibe; entryways or offices | $30-$60 (materials only) |
Sponging for Effortless Texture
This method uses a natural sea sponge to dab paint onto the wall in layers. The result is a soft, mottled appearance that mimics upscale decorative finishes but is much more budget-friendly. Simply dip the dampened sponge into a small amount of paint and gently press it onto the wall in random patterns. Build up layers with different shades for added dimension.
Rag-Rolling for Elegant Depth
Rag-rolling creates a sophisticated look by rolling a loosely twisted rag dipped in glaze over freshly painted walls. This technique works well with neutral tones or metallic glazes for a touch of glamour. Practice on a sample board first to get comfortable with the motion and pressure required.
Create an On-Trend Faux Concrete Look
The faux concrete finish is perfect if you love industrial design but don’t want the cost or weight of real concrete panels. Start by applying a base coat of gray paint, then use a trowel or putty knife to layer on lighter and darker shades in uneven patches. Blend as you go for an authentic effect. Once dry, seal with a matte clear coat for durability.
Pro Tip:
Always test your chosen technique on a small section of wall before tackling the entire room. This ensures you’re happy with the color combination and texture before committing!
4. Removable Wallpaper and Decals
If you’re looking for a way to make a big designer statement without making a permanent commitment or breaking the bank, removable wallpaper and decals are the ultimate solution. These peel-and-stick wall treatments have surged in popularity, especially among renters and budget-savvy homeowners, because they offer flexibility, affordability, and endless design possibilities.
Why Choose Removable Wallpaper and Decals?
Unlike traditional wallpaper, which can be costly and difficult to remove, peel-and-stick options are simple to apply and just as easy to take down. This makes them perfect for those who like to change up their décor frequently or who need a non-permanent solution for apartments or rental homes.
| Feature | Removable Wallpaper & Decals | Traditional Wallpaper |
|---|---|---|
| Installation | Easy DIY (peel-and-stick) | Often requires paste & professional help |
| Removal | No residue, renter-friendly | Difficult, may damage walls |
| Cost | Budget-friendly | Can be expensive |
| Design Options | Trendy & customizable | More limited by permanence |
How to Use Peel-and-Stick Wall Treatments Like a Designer
- Create an accent wall in your living room or bedroom with bold patterns or textures.
- Add geometric decals for a playful touch in kids’ rooms or home offices.
- Mimic expensive materials—think faux brick, marble, or wood—for a high-end look at a fraction of the cost.
Pro Tips for Success
- Make sure your walls are clean and smooth before application for best results.
- If you’re unsure about a pattern or color, start with a small area or test swatch.
- Mix and match different decals to create custom designs unique to your home.
With so many styles available—from subtle textures to bold prints—removable wallpaper and decals allow you to personalize your space quickly and affordably. Whether you’re renting or just love switching things up, these wall treatments prove that designer style doesn’t have to come with a hefty price tag or long-term commitment.
5. Half-Painted and Color-blocked Walls
Half-painted and color-blocked walls are a budget-friendly way to bring a designer edge to your home without the hefty price tag. This paint technique involves painting only a portion of your wall—usually the lower or upper half, or creating bold geometric shapes with contrasting colors. It’s an easy DIY project that can create visual interest, help define different zones within open floor plans, and mimic the look of high-end interiors often seen in magazines.
Why Choose Half-Painted or Color-Blocked Walls?
This approach offers flexibility: you can use neutral tones for a subtle effect or go bold with vibrant hues for maximum impact. Half-painted walls can make ceilings look higher, while color-blocking can highlight architectural features or create an accent wall without overwhelming the room.
Popular Applications
| Application | Description | Designer Tip |
|---|---|---|
| Chair Rail Effect | Paint the lower half of the wall a darker shade for instant elegance. | Pair with crisp white trim for contrast. |
| Vertical Blocks | Create tall color blocks behind furniture to draw the eye upward. | Use painter’s tape for sharp lines. |
| Diagonal Splits | Add dynamic energy with diagonal divisions across the wall. | Mix soft pastels for a modern twist. |
| Zoning Spaces | Define work nooks, reading corners, or dining areas with different block colors. | Repeat accent color in decor for cohesion. |
Budget-Friendly Designer Look
You don’t need expensive wallpaper or millwork to make your space feel curated. With just painter’s tape, a level, and a couple of quarts of paint, you can transform any room in a single afternoon. This method is perfect for renters too—just repaint before moving out!
6. Unexpected Trim and Ceiling Colors
When it comes to giving your space a high-end look without the high price tag, most people focus on wall colors. However, one of the best-kept secrets among interior designers is playing with bold or contrasting hues on baseboards, crown molding, and ceilings. This simple paint trick can instantly elevate a room, making it feel custom and curated.
Why Paint Trim and Ceilings?
Traditionally, trim and ceilings are painted white or left neutral to blend in. But by choosing unexpected shades—think deep navy on baseboards or a pale blush ceiling—you create visual interest and depth without investing in expensive materials or labor-intensive wall treatments.
Design Impact vs. Cost Table
| Element | Traditional Approach | Designer Trick | Cost Difference |
|---|---|---|---|
| Baseboards | Standard White | Bold Contrasting Color (e.g., Charcoal) | $ (just extra paint) |
| Crown Molding | Cream/White | Deep Hue Matching Walls or Ceiling | $ (minimal, just different paint color) |
| Ceiling | Flat White | Pale Pastel or Dramatic Dark Tone | $ (no additional cost if DIY) |
How to Choose Colors That Wow
- Contrast: Pick a trim color that stands out against the wall for a modern edge.
- Tonal Harmony: Use a darker or lighter shade of your wall color for subtle sophistication.
- Dramatic Ceilings: Try navy blue, charcoal, or soft pink overhead for instant designer vibes.
- Finish Matters: Use satin or semi-gloss on trim for durability and a polished look; try flat or eggshell on ceilings to minimize imperfections.
Pro Tips for Success
- Test First: Always sample your chosen colors in natural light before committing.
- Tape Carefully: Crisp lines make all the difference; use painter’s tape for clean edges.
- Keep Hardware Neutral: If you’re going bold on trim, keep door handles and fixtures simple to avoid visual clutter.
This strategic use of unexpected trim and ceiling colors is an easy, affordable way to mimic a designer finish in any home. It’s proof that thinking outside the box—and off the walls—can totally transform your space on a budget.